Tampilkan postingan dengan label Pilgrim Crafts. Tampilkan semua postingan

Thanksgiving Pilgrim's Hat for Boys

Harken back to the spirit of Plymouth Rock with this Pilgrim hat for boys. Kids can make their own to wear for a play or on Thanksgiving Day!

What you'll need:

  • 10x13" Black construction paper
  • 9x12" Gray construction paper
  • Tape
  • Pen or pencil
  • Scissors
  • Glue

How to make it:

  1. Cut an oval out of the black construction paper the full size of the paper.
  2. Cut a strip of paper to make a band to put around the boy's head, tape it. Put that circle (slightly oval) on the paper to trace the inner circle. Then draw a circle around it. Leave about a 2" brim on 3 sides and about 4" on the "front".
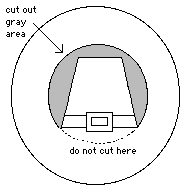
  3. Draw the trapezoid, and cut out the gray parts. (see photo)
  4. Cut out a band and band and buckle out of gray paper.
  5. Glue the hat band on the hat and then the buckle on top of the band.
  6. Bend the hat piece up and try on the child.
  7. You may need to adjust the opening to fit the individual child's head.
  8. On the underneath side, apply tape to the two points where the hat bends. This will help reinforce the stress point, and hopefully prevent tearing.

Tips:

This hat could probably also be made out of felt. I would suggest cutting 2 hats out of black, and gluing the two together to give the hat stability.

  • Digg
  • Del.icio.us
  • StumbleUpon
  • Reddit
  • RSS
Read Comments

Beanbag Animal Thanksgiving Costume

Include your stuffed toys in the holiday fun with this beanbag animal Thanksgiving costume. Kids love to see their toy animals dressed up in this craft.

What you'll need:

  • Light-brown felt
  • Navy-blue felt
  • Velcro with sticky back
  • Scissors
  • Tacky glue
  • Ruler
  • Pen

How to make it:

  1. Cut a piece of light-brown felt 3/4-inch wide by nine-inches long.
  2. Cut a feather one-inch wide by 2 1/4-inches long.
  3. Cut little notches along the side.
  4. Glue a feather to one side of the band (at the long side of the strip). (see photo)
  5. Adjust the band to fit the beanbag animal.
  6. Cut a piece of Velcro and adhere it to other end of the strip.


 To make the breechcloth:

  1. Cut a piece of light-brown felt, about five-inches wide by  2 1/4-inches long.
  2. Cut 1/2-inch down from the long side in towards middle. Cut 1 1/2-inches in towards the middle on each side. (see photo)
  3. Cut 1/4-inch little snips all along the bottom length of breechcloth to create a fringe.
  4. Adjust the breechcloth to fit on the beanbag animal.
  5. Cut a piece of Velcro and adhere it to one end of breechcloth waistband.

  • Digg
  • Del.icio.us
  • StumbleUpon
  • Reddit
  • RSS
Read Comments

Hat for Boy Beanbag Animals

Once your stuffed toys are all dressed up for Thanksgiving, this pilgrim hat for boy beanbag animals will complete the ensemble. 

What you'll need:

  • White felt
  • Black felt
  • Gray felt
  • Scissors
  • Tacky glue
  • Ruler
  • Pen

How to make it:

To make the Pilgrim Boy Beanbag's Hat:

  1. Cut an oval out of a piece of 2 1/2-inches by three inch black felt.
  2. Draw a 1 1/2-inch circle about 1/2-inch from one end of the oval, centering it between the sides.
  3. Draw the trapezoid, and cut out the gray parts.
  4. Cut out a band and buckle out of gray paper.
  5. Glue the hat band on the hat and then the buckle on top of the band.
  6. Bend the hat piece up and fit it to the beanbag animal.
  7. You may need to adjust the opening to fit the individual beanbag animal's head.


To make the collar:

  1. Cut a piece of white felt to about 3 3/4-inches by wide four inches long.
  2. Fold the felt in half from the top to the bottom (see picture).
  3. Cut a one-inch by two-inch half circle out of the folded edge (see picture). This may need to be adjusted depending on the beanbag animal you are making it for.
  4. Cut a V-shape out of the bottom middle of the felt to about 1/2-inch from the neckline.
  5. Cut a slight angle from the bottom edge (about 1/2-inch from the side) to about 3/4-inch from the folded edge. Repeat on the other side.
  6. Unfold the collar and try it on your beanbag animal.
  7. Adjust to fit.

  • Digg
  • Del.icio.us
  • StumbleUpon
  • Reddit
  • RSS
Read Comments

Pilgim's Hat for Girls

Kids can sport the epitome of 1600s style by making and wearing this Pilgrim hat for girlsa perfectly fashionable craft for Thanksgiving Day.

What you'll need:

  • 12 by 18 inch white construction paper
  • Glue
  • Scissors
  • Hole punch
  • Yarn


How to make it:

  1. Fold the paper lengthwise back two inches to create the front opening. Crease well.
  2. Bend, without folding, the hat over the child's head so that the two shorter ends meet at each side of the child's jawline.
  3. Mark the paper with a pencil where it will meet a the child's jawline, then cut a slit about six inches from the end of the paper towards the head. Cut another slit about six inches from the other end in towards the head.
  4. Bending paper back in same position as if on child's head, fold the middle section down and hold.
  5. Fold one side over the middle section and glue in place.
  6. Fold the other side over the other two sections and glue in place.
  7. Place the hat on a flat surface with the face opening up. Place something like a heavy book on it to hold in place.
  8. Let dry.
  9. On each end, hole punch one hole in the turned over flap.
  10. Tie a piece of yarn to each hole.
  11. The child then puts the hat on and ties the yarn to hold it on her head.
  12. Cute as can be, and simple to make! 

Tips:

This hat could also be made out of felt and used each year. You could use Velcro to hold the hat in place, and then lay it out flat for storage.

  • Digg
  • Del.icio.us
  • StumbleUpon
  • Reddit
  • RSS
Read Comments

Clothes for Boy Beanbag Animals

Make sure your stuffed toys don't feel left out of the Thanksgiving celebrations by crafting these pilgrim clothes for boy beanbag animals.

What you'll need:

  • White felt
  • Black felt
  • Gray felt
  • Scissors
  • Tacky glue
  • Ruler
  • Pen

How to make it:

To make the Pilgrim Boy Beanbag's hat:

  1. Cut a piece of black felt two-inches wide by 5 3/4-inches long. (hat)
  2. Cut a piece of black felt 1 3/4-inches wide by 3 1/2-inches long. (hat brim)
  3. Cut two pieces of gray felt 1/2-inch wide by 2 1/2-inches long.
  4. Cut a piece of gray felt one-inch wide by 1 1/4-inches tall. Cut a rectangle out of the middle. This is the buckle for the hat.
  5. Starting at the short end of the hat, and about 1/4-inch from the long edge of the hat, glue one long piece of gray felt to the hat.
  6. At the end of the gray strip, glue the buckle on the hat (next to the edge).
  7. Glue the next gray strip to the other side of the buckle. (see photo)
  8. Bend the hat into a circle that will fit on the brim. Glue the short ends of the hat together.
  9. Glue the hat onto the brim.
  10. Stuff the hat lightly with scraps of felt to maintain the shape.
  11. Cut a round piece of felt to fit the top of the hat. Glue it in place.
  12. Cut a small hole in the bottom of the hat brim to make it sit on the animal's head.


pilgrim hat

To make the collar:

  1. Cut a piece of white felt measuring about 3 3/4-inches wide by four-inches long.
  2. Fold the felt in half from top to bottom (see picture).
  3. Cut a one-inch by two-inch half circle out of the folded edge (see picture). This may need to be adjusted depending on the beanbag animal you are making it for.
  4. Cut a V-shape out of the bottom middle of the felt to about 1/2-inch from neckline.
  5. Cut a slight angle from the bottom edge (about 1/2-inch from side) to about 3/4-inch from the folded edge. Repeat on the other side.
  6. Unfold and try the collar on your beanbag animal.
  7. Adjust it to fit.

  • Digg
  • Del.icio.us
  • StumbleUpon
  • Reddit
  • RSS
Read Comments

Animal Clothes

Make sure your stuffed toys are included in all the Thanksgiving fun with these Pilgrim clothes for girl beanbag animals. 

What you'll need:

  • White felt
  • Scissors
  • Tacky glue
  • Ruler
  • Pen
  • Yarn or ribbon, optional

How to make it:

To make the Pilgrim Girl Bean Bag's Hat:

  1. Cut a piece of white felt 4" wide x 6" long.
  2. Fold the felt lengthwise back 1/2" to create the front opening. Glue down and press firmly.
  3. Measure in 2" along the long side. Cut up from long side towards brim. Make a 1 3/4" straight cut.
  4. Repeat step above, measuring in from other side. This will give 3 cut sections on back of hat.
  5. Bend, without folding, the hat brim in a half oval.
  6. Hold brim in place, bend felt middle section down and hold.
  7. Fold one side over the middle section and glue in place.
  8. Fold the other side over the other two sections and glue in place.
  9. Place the hat on a flat surface with the face opening up. Place something like a heavy book on it to hold in place.
  10. Let dry.
  11. Optional: On each end, hole cut a small hole in the turned over flap. Tie a piece of yarn or ribbon to each hole.
  12. Try the hat on your bean bag animal, tie the yarn together in a bow to hold it on their head.
  13. Optional: cut openings in hat for ears to stick out.
  14. Cute as can be, and simple to make!
pilgrim hat


To make the collar:

  1. Cut a piece of white felt to about 3 3/4" wide x 4" long.
  2. Fold the felt in half from top to bottom (see picture).
  3. Cut about a 1" x 2" half circle out of the folded edge (see picture). This may need to be adjusted depending on the bean bag animal you are making it for.
  4. Cut a V-shape out of the bottom middle of the felt to about 1/2" from neckline.
  5. Cut a slight angle from the bottom edge (about 1/2" from side) to about 3/4" from the folded edge. Repeat on other side.
  6. Unfold and try on your bean bag animal.
  7. Adjust to fit.

  • Digg
  • Del.icio.us
  • StumbleUpon
  • Reddit
  • RSS
Read Comments

Finger Puppet Pilgrim

Keep kids entertained while waiting for Thanksgiving dinner this year by making these cute pilgrim paper finger puppets. Kids can have a puppet show while they eagerly wait for the turkey to emerge from the oven.

What you'll need:

  • Construction paper: white, brown, black and yellow
  • 2 short or 1 long cardboard tube(s)
  • Scissors
  • Glue stick
  • Peach and pink crayons
  • Black marker
  • Pattern

How to make it:

  1. Color a 2” x 6” section of white construction paper with the peach crayon. Cut out section then cut in half. You should now have 2- 2” x 3” peach pieces.
  2. Glue the peach strips to the top of the 2 cardboard tubes. These will be the faces.
  3. Cover the remainder of the cardboard tubes with black (man) and brown (woman) construction paper, overlapping the peach face a little.
  4. Cut 2 collars from white construction paper using pattern. Glue to top of shirt, wrap around and glue in place.
  5. Cut woman’s hair from yellow construction paper using pattern. Cut man’s hair from brown construction paper, cut a strip about the width of the woman’s hair. Wrap around the back of the cardboard tubes, peach paper in the front, and trim if needed. Glue in place.
  6. Cut hat from black paper and bonnet from white using patterns. Cut a small strip of brown for the hatband, glue and trim. Cut small strips of white paper for the buckle. Glue to the hatband. Glue hat to man’s head and bonnet to woman’s head.
  7. Use pink crayon to add rosy cheeks.
  8. Use black marker to add eyes and smile.
  9. Insert fingers into bottom of tube and play with your puppets!

Tips:

  • Save paper towel and toilet tissue tubes for projects such as this. 
  • Buy construction paper in value packs from discount department stores.  
  • White school glue is a suitable substitute for glue sticks, just spread with a soft paintbrush or your fingers.

  • Digg
  • Del.icio.us
  • StumbleUpon
  • Reddit
  • RSS
Read Comments