Tampilkan postingan dengan label Fall Crafts. Tampilkan semua postingan

Paper Plate Sunflower

Make a pretty sunflower to display in your kitchen or in a child’s window. Make several and place them in a coffee can filled with floral foam to make a fun bouquet!

For more great ideas for celebrating autumn, view our full list of Fall Crafts.

What you'll need:

  • Mini paper plate
  • 1 pkg small brown pom-poms
  • Wooden dowel
  • 1 sheet green felt
  • White craft glue
  • Yellow acrylic paint
  • Green acrylic pant
  • Paintbrush
  • Scissors
  • 2 green chenille stems
  • Hot glue gun
  • 3-D lime green paint (optional)

How to make it:

  1. Use scissors to cut one inch slits all the way around the paper plate, going about 1/3 inch in.  Use scissors to round each slit, forming the petals. 
  2. Line work surface with some newspaper and paint the paper plate yellow. Allow to dry and repeat if needed.
  3. Paint the dowel with green paint and allow to dry. 
  4. Draw a large circle in the center of the paper plate with the white craft glue. Fill in the circle so that there is enough glue for the pom-poms to stick to. Start at the center and work your way outward with the pom-poms until the center of the flower is complete. 
  5. Fold each chenille stem in half, twisting the open ends about two inches in. Form the loop end into the shape of a simple leaf. You should have two leaves with stems.
  6. Lay chenille leaves side by side on the green felt. The stem of each leaf should hang over the edge of the felt. Fold the felt over the chenille leaf and trim off excess so that just the leaves are covered. Note that the stems and points of leaves are at the fold.
  7. Hot glue one side of a leaf onto the felt and repeat for the second leaf. Put hot glue on the exposed side of the chenille and run a line of hot glue down the center of the leaf (on the felt). Fold over the felt and glue in place. 
  8. Trim the felt around the outer edge of the leaves.
  9. Twist the stem portion of the chenille around the dowel. Repeat on the other side. Tack in place with a dot of hot glue.
  10. Use a scrap of the leftover felt, about four inches long, to fold over the top of the dowel. Glue it together to hold the dowel to the paper plate. Glue the felt at the top of the dowel to the back of the paper plate flower.

  • Digg
  • Del.icio.us
  • StumbleUpon
  • Reddit
  • RSS
Read Comments

Straw Hat Pins

Moms, Grandmas and all the women in your life will adore these pretty straw hat pins! They’re easy to put together and oh-so-festive!  

What you'll need:

  • Small straw hat (about 3 or 4 inches wide)
  • Small silk flowers and berries
  • Raffia
  • Hot glue gun
  • Pin back

How to make it:

  1. Tie a piece of raffia around the rim of the hat. You may find it easier to tack the back in place with a dab of hot glue so that it doesn’t slide off while you are tying a knot or bow. Tie into a knot and trim the ends or make a pretty bow.

  2. Decorate the rim of the hat with small silk flowers and/or berries. Use fall colors to highlight the season.

  3. Hot glue a pin back to the back of the hat.

  • Digg
  • Del.icio.us
  • StumbleUpon
  • Reddit
  • RSS
Read Comments

Fall Photo Placemat

This fun keepsake pulls double duty as a useful placemat for meals and a great way to display your favorite family photos. These make great gifts for Grandma and other relatives as well. 

What you'll need:

  • 1 sheet white craft foam
  • Clear contact paper
  • Silk or real leaves
  • 5” x 7” photograph
  • A few tiny silk flowers
  • Hot glue gun
  • White craft glue
  • Paper cutter or scissors

How to make it:

  1. Glue photo to the center of the white foam. Use a sponge applicator or your finger to spread the glue evenly on the back of the photo so that there are no bumps or lumps.
  2. Use a hot glue gun to decorate the “frame” around the photo with leaves. If you’re using real leaves, make sure they are bug free and not too dried out or they may crumble.
  3. Add a few tiny silk flowers around the frame. You can also use some whimsical fall stickers if you like.
  4. Cover both sides of the foam placemat with contact paper. Make sure you follow manufacturer’s instructions.
  5. Trim the edges, leaving about ¼” of the contact paper over the edges of the foam.

  • Digg
  • Del.icio.us
  • StumbleUpon
  • Reddit
  • RSS
Read Comments

Salt Dough Leaf Magnets

Now that the kids are back in school, the need for hanging things on the fridge has returned. Why not make your own magnets such as these salt dough leaf refrigerator magnets and hang precious artwork and those A+ papers with? A fun project for any age!

What you'll need:

  • Leaf shaped cookie cutters
  • Acrylic paint in red, yellow, green, orange and brown
  • Paint brush
  • Toothpick
  • Acrylic spray sealer, matte
  • ½” round magnets
  • Hot glue gun

How to make it:

  1. Preheat the oven to 250 degrees F.
  2. Mix together, salt, flour, and water until a dough is formed.
  3. Knead the dough on a floured surface until the mixture is elastic and smooth. If dough is too sticky, sprinkle with flour, continue to do so until stickiness is gone. Do not add too much flour, this will dry out the dough and will cause it to crack before you get a chance to bake it.
  4. Roll out the dough to about ¼” thick with a rolling pin that has been dusted with flour.
  5. Use different sized cookie cutters to create as many shapes and sizes of leaves that you want.
  6. For smaller children, use a single shape to make it easier at painting time. For older children, you can double up and even triple some of the leaves for a 3D affect as we did (see photo).
  7. If desired, use the toothpick to draw lines in the leaves.
  8. Place all leaves onto an ungreased cookie sheet and place into the preheated oven.
  9. Bake for two hours.
  10. Remove from oven and allow to cool completely.
  11. Paint with acrylic paints and spray finished leaves with acrylic sealer.
  12. Hot glue a round magnet to the back of each leaf and hang on the fridge!

Tips:

  • Parents should not allow small children to handle a glue gun as burns can occur. Older children should be closely supervised if allowed to handle themselves.
  • Instead of a toothpick you can use the sharp edge and point of a small kitchen paring knife, but again, only parents should handle these types of utensils.
  • Salt dough will not keep for a later project, it will get hard and crack. Depending on how many ornaments you plan to make, you can either halve the recipe or double it.

  • Digg
  • Del.icio.us
  • StumbleUpon
  • Reddit
  • RSS
Read Comments

Muffin Tin Crayons

Do you have what seems like hundreds of broken crayons laying around? Before you toss them in the garbage, enjoy a fun project with your kids! We’ve chosen fall colors—to help us color our fall coloring pages.--but you can choose any combination that you like.

What you'll need:

  • Cupcake/muffin tin
  • Non-toxic broken crayons
  • Vegetable oil
  • toothpick

How to make it:

  1. Preheat the oven to 275 degrees F.
  2. Remove all the paper labels from crayon pieces. (Please check to make sure they are non-toxic crayons.)
  3. Put ¼ teaspoon of vegetable oil into each muffin pan cup, no cup liners needed.
  4. You will use the equivalent of 4 new crayons for each cup. Place broken crayons (no longer than an inch each) into the muffin pan. This will fill the cup about 1/3 full.
  5. Place into the preheated oven and watch carefully, they melt quickly!
  6. Bake crayons for 8 minutes or so.
  7. When the crayons begin to melt, remove them from the oven and stir gently with a toothpick.
  8. Crayon will look “ugly” and the colors may appear blended too much. Don’t worry! They look much better on the other side.
  9. Let the crayons cool completely.
  10. Once cooled, pop the crayons out of the muffin pan by tapping on the backside of the pan. Crayons should fall right out.


Tips:

  • If you have any new crayons available, use one as a measuring stick. Lay broken crayon pieces along side of the new crayon to measure out 4 full sized crayons. This is how many you will need for each completed chunky crayon.
  • Be sure to use extreme caution around kitchen utensils and the oven. Always use oven mitts and do not stick you fingers into the melted crayons.
  • If you don’t have any broken crayon pieces, you can buy a large box of cheap crayons at the Dollar Store.

  • Digg
  • Del.icio.us
  • StumbleUpon
  • Reddit
  • RSS
Read Comments

Acorn Wreath

This acorn wreath is a wonderful fall craft project that makes a great gift or decoration for your home.

What you'll need:

  • Acorns
  • Wicker wreath
  • Hot glue gun
  • Glue sticks
  • Newspaper
  • Flowers or other decoration

How to make it:

  1. First, spread the newspaper on a flat surface.
  2. Lay your wreath down flat.
  3. Heat your glue gun.
  4. Next, starting in the middle of the wreath, begin gluing the bottom of the acorn. Place the glued part of the acorn in the middle of the wreath and stand the acorn straight up.
  5. Make one row in a straight line going all the way around the wreath.
  6. Repeat the process from top to bottom with the wreath still laying flat.
  7. Then decorate with flowers, bows, or even holiday ornaments. Be sure not to leave any open spaces except in the back. The back of the wreath shouldn't have any acorns on it so when you lay it down it is flat.

Tips:

  • A wreath hanger is recommended because it is very heavy.

  • Digg
  • Del.icio.us
  • StumbleUpon
  • Reddit
  • RSS
Read Comments

Apple Printing

Create a stamp with apples and kids can begin printing their own designs on everything from wrapping paper to T-shirts.

What you'll need:

  • Apples
  • Paint
  • Paper plate, shallow tray, or wide paint brushes
  • Something to print on, like paper
  • Newspapers to protect the table
  • Knife to cut the apple

How to make it:

  1. Apple printing is always fun: there are two very different prints you can get by cutting apples in half through the middle OR from the top to bottom.
  2. You can cut them in half through the stem, dip them in red and green paint, and make a very nice-looking collage of apple shapes. Cutting them through the middle makes a circle stamp with a star in the middle. 
  3. To paint on a t-shirt or tote, put a thick layer of paper inside the shirt/tote to prevent the paint from bleeding through to the back of the fabric.
  4. An easy and very effective project is to decorate a plain tote with apple stamps cut from top to bottom (making an apple shape) in a horizontal line around the tote.
  5. You can make a wreath by using two colors of green paint and apples cut through the middle (to make circles with 'star' centers). Then take a sponge, cut a triangle (for 1/2 of the bow) and dip it into red paint - add the bow. To make dark green paint, add a little black paint at a time to some green paint.
  6. You can also make a fun gift for a parent, grandparent or caregiver by brushing the paint onto the children's hands and decorating the shirt or tote with those
    special handprints.

Tips:

If you are going to make your prints on paper, use washable poster paint for good results. If you want to decorate fabric - like a t-shirt or tote, make sure to get fabric paints - and the kids need to be dressed in old clothing!

  • Digg
  • Del.icio.us
  • StumbleUpon
  • Reddit
  • RSS
Read Comments

Fall Leaf Print

An outdoor stroll and a Fall Leaf Print craft for kids all-in-one.

What you'll need:

  • Fresh moist fall leaves
  • Unbleached muslin material (available at any material store and is very inexpensive)
  • Scissors
  • Glue
  • Old newspapers
  • Hammer or wooden blocks
  • Heavy paper like grocery bag or construction paper
  • Grocery sack for leaf retrieval
  • Hard work surface

How to make it:

  1. Take a nice fall walk outside.
  2. Pick any up leaves that you like. Different colors and shapes make the best designs. I've used red maple, ferns, maple, daisy leaves. Try to stick to leaves, as flower petals do not work very well.
  3. Use caution not to pick up Poison Ivy, Sumac or Poison Oak or any other poisonous leaves in your area.
  4. Using scissors cut your muslin material to desired size. I used a 12 inch by 12 inch square, but any size or shape will do.
  5. Place old newspaper on a hard working surface. This will help to keep the color from "bleeding" through the material and onto the floor, and also to protect the work surface from the hammer.
  6. Place muslin on prepared hard work surface.
  7. Place one leaf anywhere on the material.
  8. Using your hammer or wooden block, bang on the entire leaf. This can get quite noisy depending on your group size, but it wouldn't be fun if it wasn't loud!
  9. Continue to place one leaf at a time on your material, and hammer each one completely. You can place a new leaf on parts of an old leaf.
  10. You may have some leaf parts left on the material. Just let them "dry" a little then brush them off.
  11. When finished with leaf prints, cut heavy paper in a frame design. Remember to cut the inside hole smaller than the actual picture for easier attachment.
  12. Glue leaf print to back side of paper frame. Be sure to make the brighter side of the print the part you will see.
  13. Make sure to wash you hands at the end as the color from the leaves may stain little hands.
  14. Ta DA! A picture worthy of hanging on any wall!

Tips:

This is a great project for any age. The colors come from the chlorophyll in the leaves.

  • Digg
  • Del.icio.us
  • StumbleUpon
  • Reddit
  • RSS
Read Comments

Mosaic Family Frame

You can have the warmth and charm of mosaic art without the mess, wait time and expensive materials. Try our family frame and display where all can see!

What you'll need:

  • Wooden frame, any size
  • White acrylic craft paint
  • Paint brush
  • White craft glue
  • Felt, in various colors, cut into ½” squares
  • Buttons in various colors
  • 4 white wooden beads
  • 4 brown wooden beads
  • Brown felt, cut into ¼” squares

How to make it:

  1. Paint the frame white, repeat if needed and let dry. 
  2. Sort felt into piles by color. Glue ½” squares of felt around the outer border of the picture frame, leaving a small amount of white space between each. Colors should run in a pattern and repeat.
  3. Next, glue buttons, again in a repeating color pattern, around the border below the felt squares.
  4. Lastly, glue white wooden beads, one in each corner of the remaining frame border. Glue the brown wooden beads an equal distance away from each white wooden bead (see photo).
  5. Glue ¼” squares of brown felt in between the wooden beads, running in a straight pattern.
  6. Let dry completely and add your favorite family photo.

Tips:

  • You can change the colors on this project to match the season or your specific décor. Use different shades of blue for an ocean theme or shades of brown for a more rustic touch.
  • If you don’t have enough buttons, try beads or even dried beans from the pantry!

  • Digg
  • Del.icio.us
  • StumbleUpon
  • Reddit
  • RSS
Read Comments

Thanksgiving Wreath

Theme wreaths are easy to make. A grapevine or other type wreath, a little ribbon and a few embellishments and you have a great door decoration you can be proud of.

What you'll need:

  • Grapevine wreath
  • Wide ribbon in festive fall colors
  • Hot glue gun
  • Silk flowers or other embellishments (pumpkins, gourds, berries, etc)
  • Turkey embellishment (optional)
  • Scissors
  • Over the door wreath hanger

How to make it:

  1. Lay wreath on table and using hot glue, tack the end of the ribbon to the inner center of the wreath, where all the embellishments will eventually end up.
  2. Once ribbon is tacked in place, wrap it around the wreath, leaving generous portions of the wreath showing. When you get all the way around the wreath, trim the excess off (to make a bow) and tack down.
  3. Tie excess ribbon that you just trimmed off into a bow and glue to the bottom front of the wreath.
  4. Add embellishments such as berries, nuts, silk flowers, plastic harvest vegetables, and even a turkey if you can! 
  5. Glue anything that needs to be glued, including the ribbon in various places to keep it secure.
  6. Place wreath hanger over the top of you door and hang your wreath. 

Tips:

  • Check the floral department of your local discount department store or craft supply store for all sorts of available embellishments. 
  • This is a very easy craft and most kids can either do it themselves or complete most of it with a little bit of help. However, use of the hot glue gun should be limited to adults and older children.

  • Digg
  • Del.icio.us
  • StumbleUpon
  • Reddit
  • RSS
Read Comments

Faux Stained Glass Leaves

Make several of these pretty window hangers to display in the sun. They make a lovely display using fall’s splendid colors, mirroring the falling leaves.

What you'll need:

  • 1 sheet black construction paper
  • Tissue paper in fall colors
  • 1 sheet heavy weight self-stick laminating film (recommended: Con-Tact paper)
  • Scissors
  • Glue stick
  • Toothpick
  • Ribbon
  • Suction cup hanger

How to make it:

  1. Peel back half of the backing from the laminating film, leaving the other half still protected. Fold over the backing to keep out of the way.
  2. Tear tissue paper into small squares and place onto sticky side of laminating film. Be sure to alternate colors and keep them close together, overlapping is fine too.
  3. Carefully peel the backing off the other side of the laminating film, then fold that film over onto the exposed tissue paper pieces, sandwiching them between the film. Press out any air bubbles.
  4. Trim any overlapping film off and throw away.
  5. Fold construction paper in half and cut out a simple leaf shape. This should yield two identical leaves because the construction paper was folded.
  6. Glue the very tip of the leaves together, just enough to tack it together. Using scissors or a craft knife, cut out the center of the leaf, leaving about a half-inch border, making a leaf-shaped frame for your stained glass creation. Be sure to ask an adult for help.
  7. Using your leaf-shaped frame as a guide, trim the laminated tissue paper into the shape of the leaf. Your laminated tissue paper needs to be a little bit smaller than your frame so that it does not stick out the sides. (See photo.)
  8. Glue the laminated tissue paper leaf inside the construction paper leaf frame.
  9. At the tip of the leaf, poke a hole with a toothpick for your hanger.
  10. Insert a piece of ribbon into the hole and tie in a knot. Then trim the ends.
  11. Hang ribbon on a suction cup hanger on the window.

Tips:

  • When receiving birthday gifts for your child, be sure to save the tissue papers from the gift bags to recycle in projects such as this!
  • Instead of black construction paper, make several frames with fall colors such as orange, brown, green, and red.
  • Suction cup hangers are available at your local craft supply store, usually in multi-packs.

  • Digg
  • Del.icio.us
  • StumbleUpon
  • Reddit
  • RSS
Read Comments

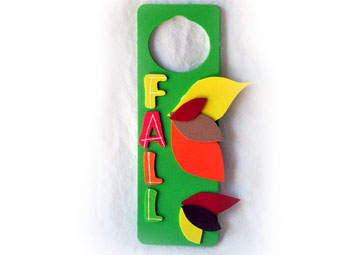
Fall Foam Leaves Door Hanger

Make this super simple door hanger for your bedroom or the front door. Usher in the colors of fall with easy-to-cut leaves made from craft foam.

What you'll need:

  • Green foam door hanger
  • Alphabet foam stickers to spell FALL
  • Craft foam: orange, yellow, tan, brown, red
  • White craft glue
  • Scissors

How to make it:

  1. Remove backing from alphabet foam stickers and press them onto the door hanger, spelling “FALL” going down the left side.
  2. Cut out simple leaf shapes from different colored craft foam.
  3. Glue leaves to the right side of the door hanger, overlapping and varying the colors as you go.
  4. Hang your finished craft!

Tips:

  • Craft foam is available in a variety of shapes and sizes, and also in sheets. If these are not available, you can buy regular foam and/or foam stickers.
  • Foam door hangers are available in multi packs, offering several different colors.
  • Use this cute project on your front door, bedroom, playroom, bathroom, or give it as a fun gift!

  • Digg
  • Del.icio.us
  • StumbleUpon
  • Reddit
  • RSS
Read Comments

Paper Plate Scarecrow

Celebrate the coming of autumn with this adorable paper plate scarecrow. It's easy to put together and uses a minimal amount of supplies.

What you'll need:

  • 1 paper plate
  • Construction paper: brown, blue, orange, yellow
  • Acrylic paint: pale yellow, pink, red, goldenrod
  • Scissors
  • Glue stick
  • Black fine tip marker
  • Pattern

How to make it:

  1. Cut 2/3 of the plate rim off, leaving 1/3 for the collar and straw. Set the 2/3 piece aside for a later step. (See photo.)
  2. Paint the round center of the plate with the pale yellow color.
  3. Paint the rest of the plate with goldenrod.
  4. Cut the pieces needed from the patterns. Use brown construction paper for the hat, blue for the hat band, yellow for the hair, and orange for the nose.
  5. Take the piece of plate that you cut off in step 1 and make a scallop cut (wavy curves). (See photo.) Set the remaining piece aside. Paint the scalloped piece red.
  6. Paint half of the remaining piece of plate with goldenrod paint. Cut into thin strips to use for the flower on the hat.
  7. Take the plate with the round center and cut the goldenrod section into fringed strips to create the neckline straw.
  8. Glue the red scalloped collar on above the neckline straw and below the round center of the plate.
  9. Glue the blue band to the hat and glue the brim on afterwards.
  10. Glue the goldenrod strips on one at a time, forming a flower shape on the right side of the hat band. Cut a small square from orange construction paper and glue to the center of the flower.
  11. Glue on the triangle nose and draw on eyes and a mouth.
  12. Dab a light amount of pink paint on for cheeks.
  13. Position hair where you want it, place hat on top of the hair. Reposition until you have it where you want it, then glue in place.
  14. Draw stitches on hat and nose if desired.
     

Tips:

  • Add 3 dimensional features to this craft by using yarn for hair and a pom pom for the center of the flower.
  • Add a magnet to the back to hang on the refrigerator.
  • Tape a piece of ribbon or string to the back to make a hanger. Hang on your bedroom door to welcome fall!

  • Digg
  • Del.icio.us
  • StumbleUpon
  • Reddit
  • RSS
Read Comments